I recently took over the position of the CTO of Tech Venturas and it now allows me to wear my technical hat full-time. I started working on a pet project to solve my own problem. This is a very detailed technical article on how I did it. So, here we go.
The problem
Tech Venturas is rapidly expanding as a global systems integrator and we’re hiring new engineers, back-office staff as well as external consultants. Every new join is given access to different systems we use in Tech Venturas where primary access is the Google Workplace, which we use for email, office documents and online meetings. We do not have an internal IT department and it had been my responsibility to create necessary accounts for new staff members joining.
Generally, all the staff members are granted access to Google Workplace, which is our standard office tool set, Zoho people, and our HRM system. If the staff member is an engineer, they are given access to Slack, our collaboration tool, Atlassian Jira and Confluence, our project management and document management tool, and GitHub, our source code repository.
We recently added a few more systems to increase our productivity and capability. As we add more people to the organization and more systems, I realized it is going to be a difficult operation to grant access to different people for each system as it was all done manually by myself. I need to figure out a way to automate this process.
The solution
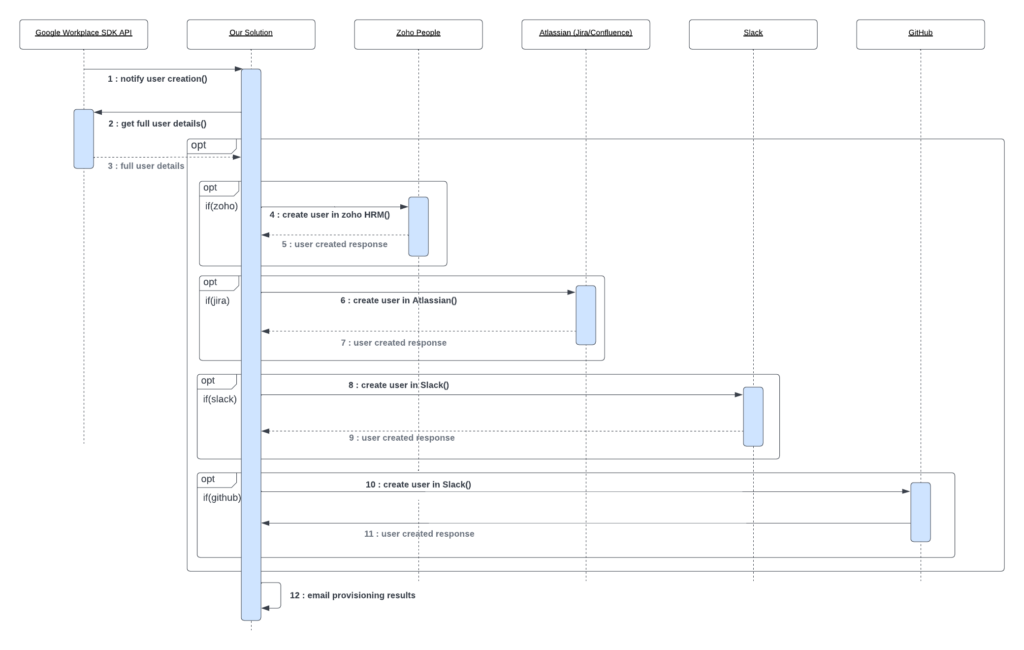
The starting point of the onboarding process of an employee is the creation of an organizational email account in Google Workspace. When an email address is created, it automatically triggers the creation of accounts for the rest of the systems allowed for the employee. The new employee may not be given access to all the systems, therefore it specifically tells the automation program which system should be given access to, for the new employee. Once all the system access is provisioned, an email is sent to the administrator stating the summary of the provisioning results.
This can be represented in a sequence diagram as follows.
Implementation of the solution
WSO2’s Choreo is a cloud-native platform specifically designed to build cloud-based integrations and APIs. It provides the perfect tools to build the solution for our problem. Ballerina is an open-source programming language developed by WSO2 to build highly optimized, cloud-native network services. Ballerina is used for developing the entire automation solution and using Choreo to publish the services. Throughout this article, I aim to explain every step of the automation solution with the actual code implementation.
Step 1 – Push Notifications from Google Workspace Admin
The email address of an employee is the single, primary identification for all the systems we use in the organization. We use Google Workspace as our email provider. The first part of our automation solution is obtaining a trigger from Google Workspace when a new email address is created for an employee. This trigger allows us to provision the new employee to other systems.
Google Admin SDK provides a way to configure a “Webhook”, which is a URL endpoint provided by our end, to receive notifications. A notification channel established with Google Workspace watches the desired events. Currently, Google Workspace provides a notification channel that notifies events about Google accounts in the organization.
Notifications flow through the established channel for events such as adding, editing and deleting users. These notifications are sent to the URL endpoint we provided from our end as a POST request by Google. The request payload is as follows.
POST https://mydomain.com/notifications // Your receiving URL.

Content-Type: application/json; utf-8

Content-Length: 0

X-Goog-Channel-ID: directoryApiId

X-Goog-Channel-Token: 398348u3tu83ut8uu38

X-Goog-Channel-Expiration: Tue, 29 Oct 2013 20:32:02 GMT

X-Goog-Resource-ID:  ret08u3rv24htgh289g

X-Goog-Resource-URI: 'https://admin.googleapis.com/admin/directory/v1/users?domain=domain&event=event

X-Goog-Resource-State:  event

X-Goog-Message-Number: 10

{

"kind": "admin#directory#user",

"id": long,

"etag": string,

"primaryEmail": string

}
The JSON payload contains 2 elements to identify the user. It is either with the “id”, which is the unique identifier of the user or the “primaryEmail”, the email address of the employee that just got created. This has 2 problems;
- It does not provide primary information such as the first name or the last name of the employee.
- We do not know which other systems to grant access to this user.
Let’s address both these issues now.
Getting information from Google about the employee
Previously, we received the email address and the unique identifier for the user. Now, we need to call another API from the Google Workspace SDK to obtain detailed information about the user. Using the Directory API of the SDK, we can call the below;
GET https://admin.googleapis.com/admin/directory/v1/users/userKey
Here, the user key path parameter should be the email address of the user in question. It provides the following API response.
{
   "kind": "directory#users",
   "users": [
             {
                "kind": "directory#user",
                "id": "the unique user id",
                "username": "[email protected]",
                "name": {
                   "givenName": "admin",
                   "familyName": "two",
                   "fullName": "admin two"
                        },
             "isAdmin": true,
             "isDelegatedAdmin": true,
             "lastLoginTime": "2013-02-05T10:30:03.325Z",
             "creationTime": "2010-04-05T17:30:04.325Z",
             "agreedToTerms": true,
             "hashFunction": "SHA-1",
             "suspended": false,
             "changePasswordAtNextLogin": false,
             "ipWhitelisted": false,
             "emails": [
                  {
                    "address": "[email protected]",
                    "type": "work",
                    "customType": "",
                    "primary": true
                  }
               ],
}
For the purpose of this article, I have shortened the response payload by keeping the essential elements needed. We need to use “givenName” and “familyName” elements, which represent the first name and the last name of the user respectively. With this, we have the answer for problem 1 above. Now let’s find out how to obtain other system access information.
Determine which systems to grant access
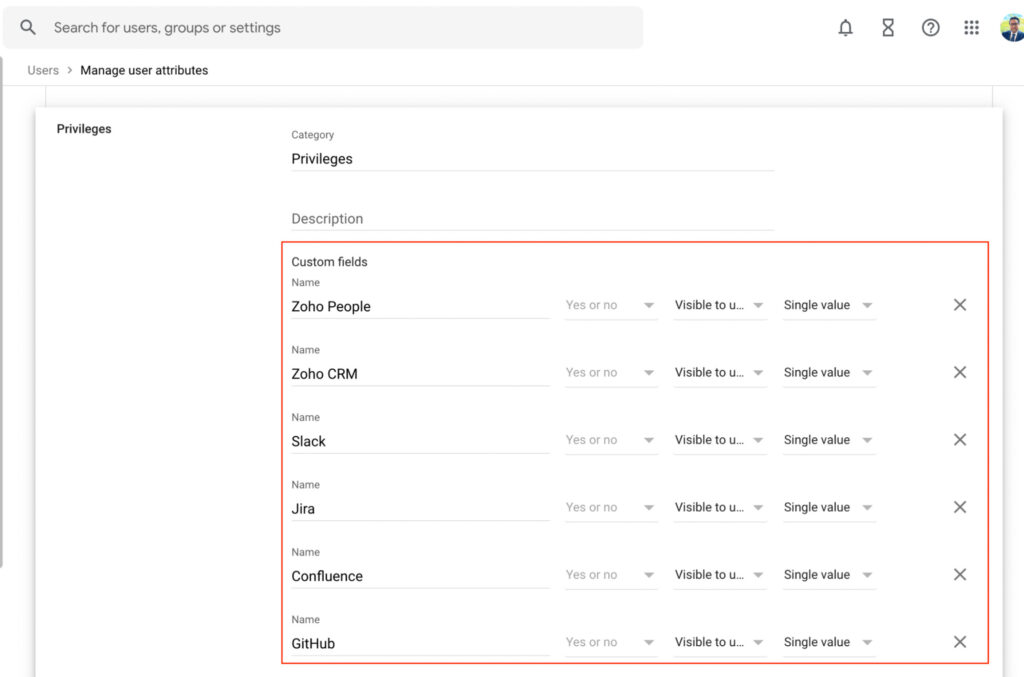
Our next challenge is to figure out how to configure system access for the new employee and retrieve it through the API response. This is where Google Workspace custom schema comes in handy. It is possible to add custom attributes to the User entity as below.
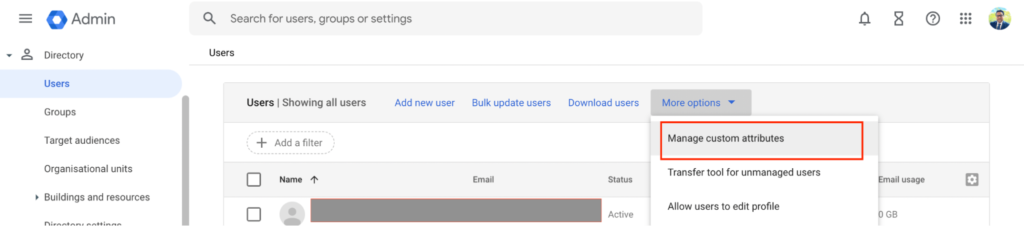
I used this functionality and added the systems we used in our organization as boolean attributes so that when a user is created, I can check/uncheck systems to be granted at the point of creating the user. Below is my custom field configuration.
When access needs to be revoked/granted for the systems, we can now simply go to Google Workspace admin, and update the user record by granting/revoking privileges using the custom fields we just created. This triggers an API call to our service through the Google push notification as explained in step 1. The code will be extended to handle the revoke/grant access accordingly.
Even if the system access is configured for the new employee, the API response does not reflect it just yet. In order to see the custom attributes, we need to include the “projection” query parameter when calling the API. The projection is an enum which has 3 values, Basic, Custom and Full. We need to pass the projection parameter as Custom to obtain configured system access information.
GET https://admin.googleapis.com/admin/directory/v1/users/userKey?projection=full
We now see the assigned systems for the user in the response below. Again, only a section of the response payload is shown below.
"customerId": "C02y4wvz7",
  "orgUnitPath": "/",
  "isMailboxSetup": true,
  "isEnrolledIn2Sv": false,
  "isEnforcedIn2Sv": false,
  "includeInGlobalAddressList": true,
  "customSchemas": {
    "Privileges": {
      "Slack": true,
      "Confluence": true,
      "Zoho_CRM": true,
      "GitHub": true,
      "Jira": true,
      "Zoho_People": true
    }
  }
}
The “privileges” element provides all our system access grants. This concludes our solution’s first step of receiving user and system access information from Google Workspace. In the next step, we build an API using Ballerina to receive the information from Google Workspace and grant the employee necessary access.
Step 2 – Building the automation
With the knowledge of the employee’s email address, first name, last name and the systems to access, we can now automate the access to the permitted systems. The entire automation application is developed using the Ballerina and each step is discussed below. We first need to build an API to receive the employee creation trigger. Google Workplace notification channel ensures that it sends a POST request to the endpoint we specify when we configured the push notifications of Google Workplace.
Configuration of client credentials for Zoho People, Atlassian, Slack and GitHub
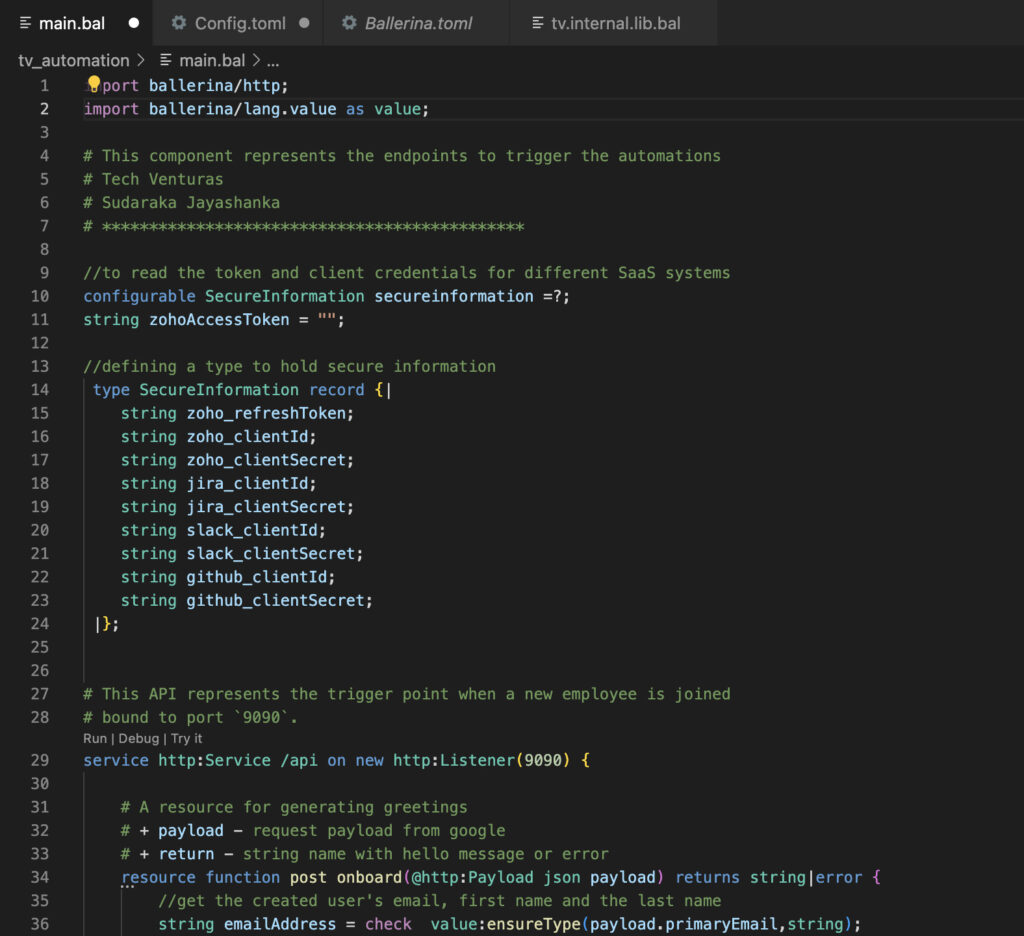
The APIs of the above systems are secured with OAuth 2.0 and we need to store the OAuth credentials for each system in the configuration (we need to secure it later, as storing sensitive values in standard configuration is not the best practice. Beleive me, it can haunt you for the rest of your life 👻) and load it later in the API invocation. We use the “Config.toml” file to store these values.

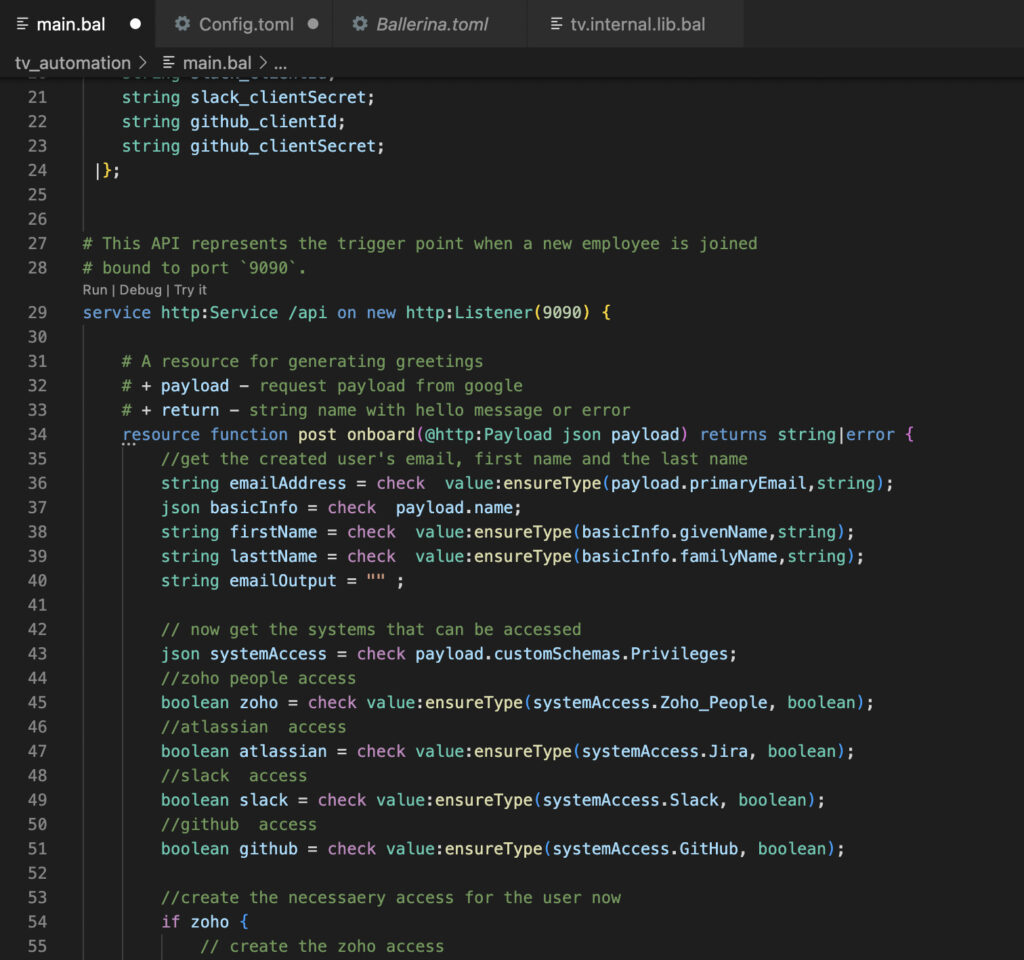
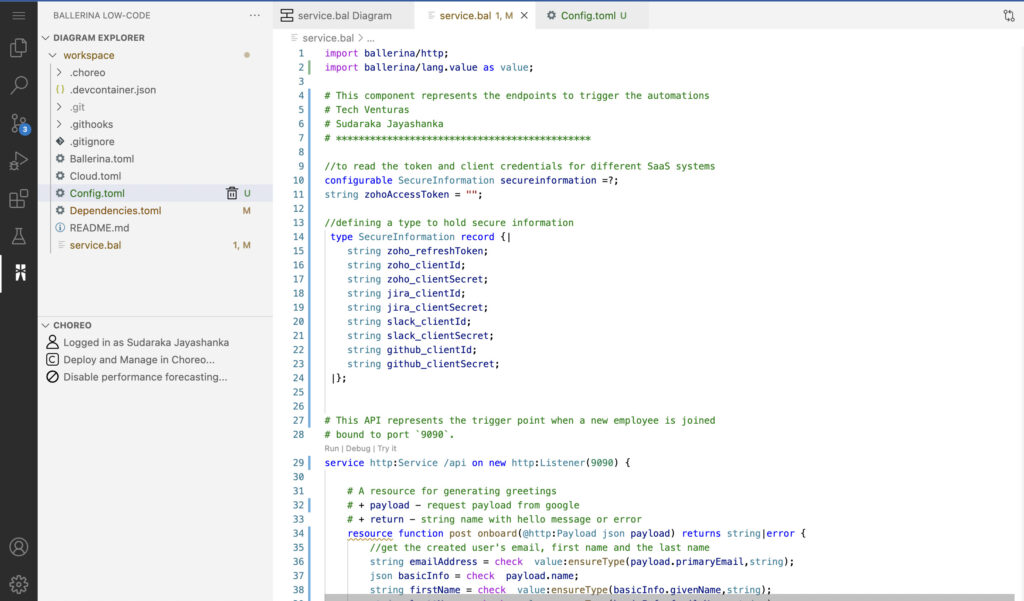
Below is the Ballerina code of our API. First, we load these credentials to a configurable type variable as line 10 below. Lines 14 to 24 are the definition of the type “SecureInformation”, which is the type of our configurable variable. It maps exactly to Config.toml.
Receiving a webhook request from Google
The resource function “onboard” of our API consumes the payload from Google that carries employee information and system access information. Line 36 to 51 denotes the extraction of employee information and access grant for each external system.
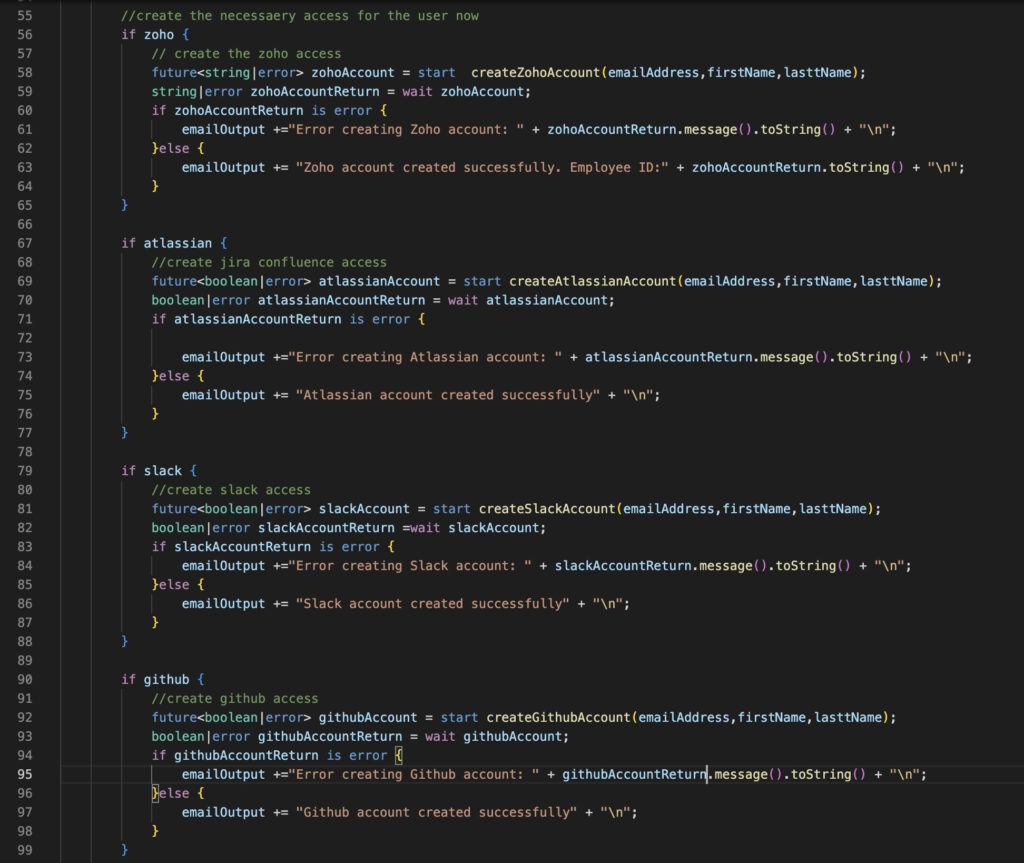
The control block
The control block below starts from line 55 and calls employee provisioning functions. Each of these functions expects the same three input parameters, first name, last name and email address and returns a boolean or an error value depending on the outcome of the functions except for the “createZohoAccount”, which returns a string and an error.
These calls are asynchronous using “start”, which runs each function on a logical thread, which waits until the execution is completed and returns a “future<T, error>” type while the control block executes other functions simultaneously.
The outcome of each function is collected to a string parameter called “emailOutput”. This is to send an email to the administrator about the outcome of the provisioning of systems for the said user. Implementation of sending the email is not covered in this article as it is trivial.
Integration functions
I don’t aim to explain each integration function for employee provisioning except for the Zoho people account creation. All the other functions follow a similar pattern more or less.
The “createZohoAccount” is elaborated in the below code from lines 107 to 147, which returns a string that contains the Zoho Employee ID that returns from Zoho when an employee record is created, or error details if the creation fails.
Zoho People API is protected with OAuth 2.0, therefore an access token is generated and sent, in order to invoke the APIs. Zoho provides a standalone client that generates an Authorization code using the clientid and secret together with the authorization code grant type which results in generating an access token and refresh token. We would store the refresh token together with the clientid and secret in the configuration to generate subsequent access tokens. This is represented between lines 111 to 120 in the code below.
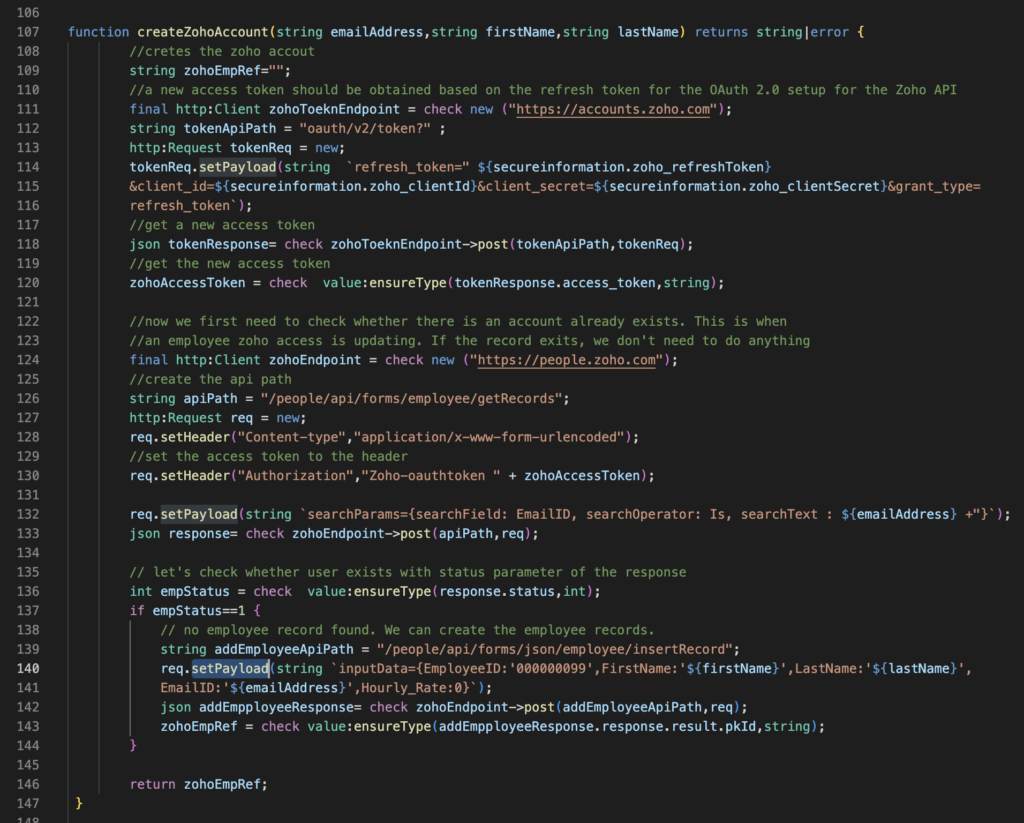
With the access token being obtained, we are now ready to provision the employee to the Zoho people but first, we need to check whether the employee record already exists. We also need to extend this code to handle the following 2 scenarios in future;
- When access from a system needs to be revoked/granted, we can simply go to Google Workspace admin, and update the user record by granting/revoking privileges using the custom fields we created in step 1. This triggers an API call to our service through the Google push notification for the user’s update event.
- When an employee leaves the organization, the Google Workspace account is removed, which triggers the user’s deletion event via push notifications.
**Note- The add, update and delete user events are in the request header “X-Goog-Resource-State” of the Google notification POST request.
From lines 124 to 130, we call the Zoho People API to check whether the user already exists using the email address. The status parameter in the response determines the user’s existence. With status being 1, where the employee record does not exist, we make the second call to the Zoho API to create the employee record. Zoho follows a peculiar way of sending the request payload as a single, form-parameter as depicted in line 140. With this, Zoho shall create the employee account and return the created employee ID in the response JSON payload.
Step 3 – Publishing the automation service with Choreo
Development of the API
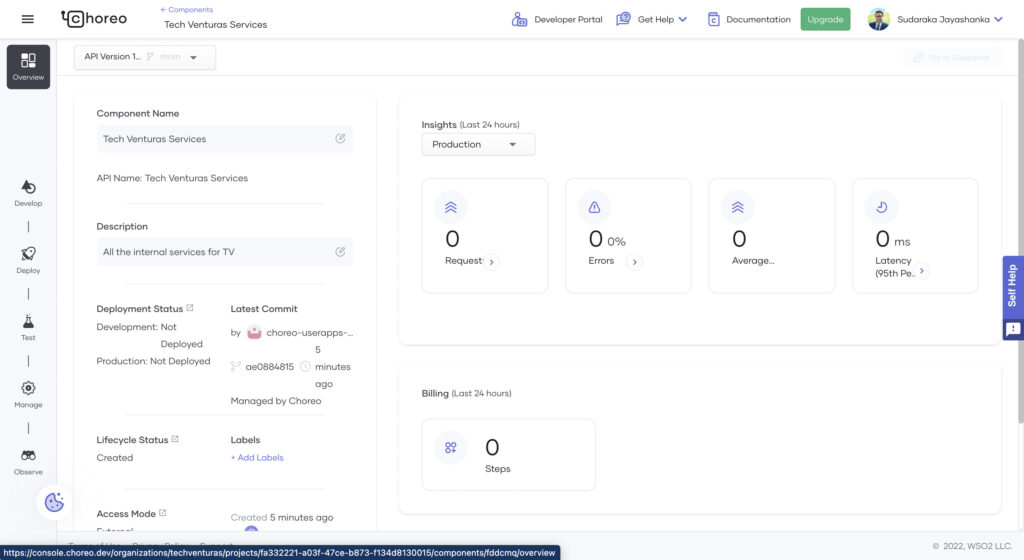
We’re now ready to deploy the automation service in Choreo. I use my Tech Venturas Choreo account to create a new Component type “Rest API” as below.

By providing the name and description of the API we create the API as below.
 |
 |
The service is created and the overview of the service displays below.
Clicking on the Develop->Edit Code function in Choreo opens the web version of Visual Studio Code. It shows the default service created in the “Diagram View”. Clicking on the “Show Source” icon opens the code view.
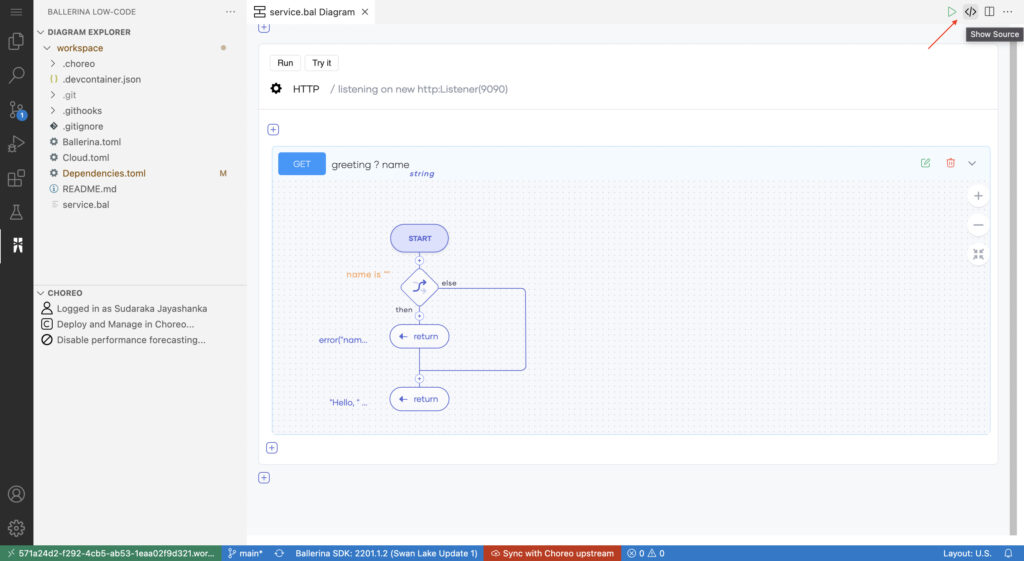
As you can see in the screen above, we have not synchronized our code with the Coreo code repository yet. Hence it shows in the status bar in red. We will push the code to the repository later in this section.
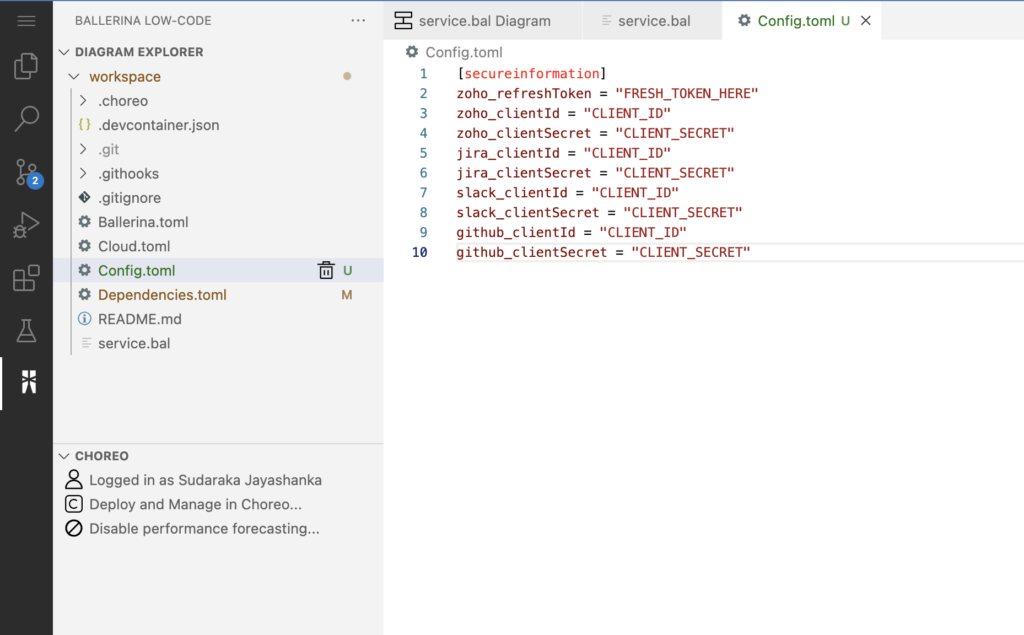
We can start moving our Ballerina automation service to Choreo. The first step is to create a new file called “Config.toml” and copy the content from our local code.
Next, copy the Ballerina code we developed into the service.bal file.
When we created the Choreo API, we specified that the source code of the service will be managed in the Choreo repository. We commit and push the code with Choreo directly from the VSCode web editor. Once in sync with Choreo, the VSCode status bar reflects this as below;
![]()
Deployment of the API
To start the deployment process, clicking on the deploy function, brings the below screen to configure the deployment.

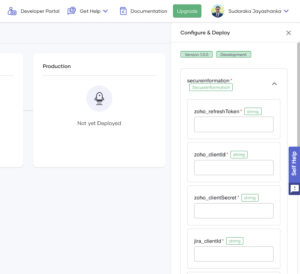
A really cool feature in Choreo is when you click on “Config & Deploy” is that it opens a panel to add the values to the config variables we specified in our Config.toml file.
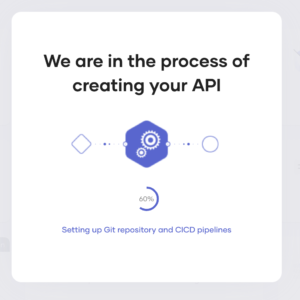
0nce the configuration is provided, by clicking the “Deploy” button, the deployment process starts as below.
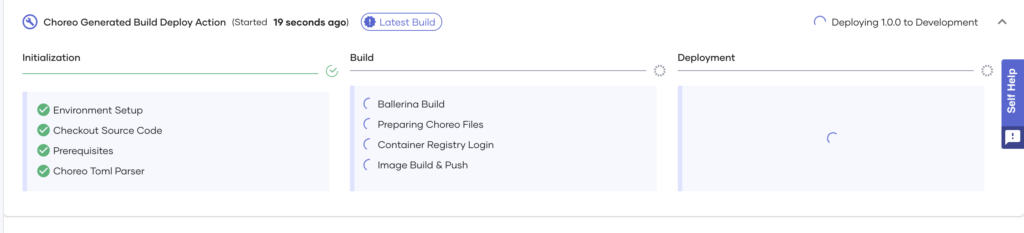
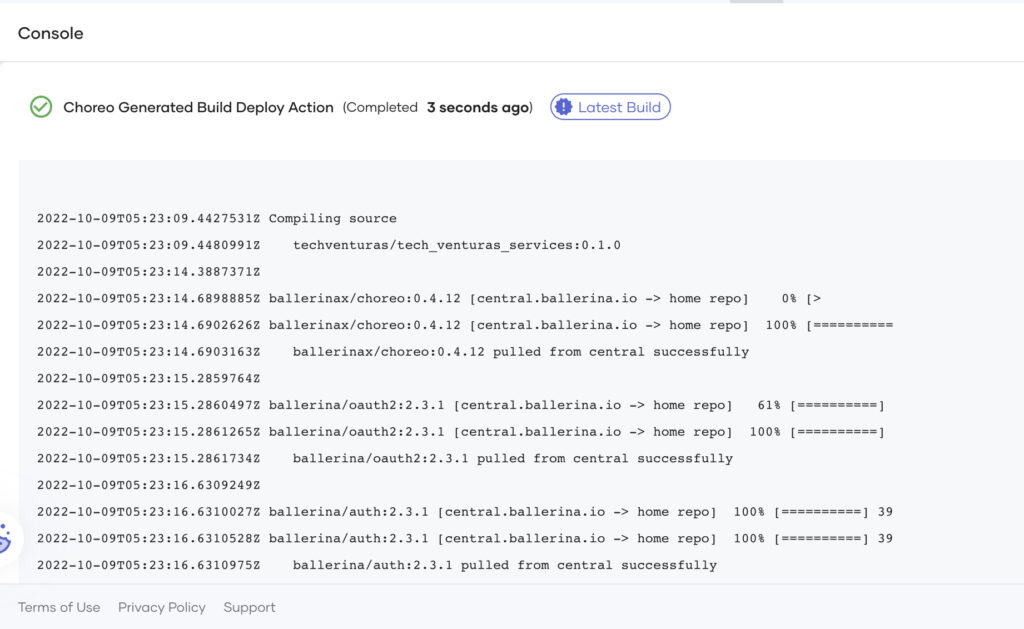
And our deployment is now completed!
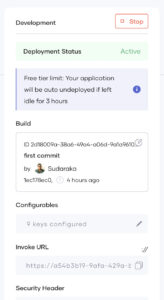 |
All looking good and our automation service is deployed in the development environment now. Choreo provides the functionality to stop the API at any time, update the configuration values etc. The service endpoint of the deployed API can be copied direction from Invoke URL. Now, all we got to do is to configure this URL in Google Workspace as the webhook URL. |
Conclusion
I have been a great fan of the Ballerina language since 2018 and I was out of touch for the last year or so. I’m getting back to it with the Swan Lake Update 2. I see there are many new great language improvements since the last time I used Ballerina. One thing always puzzled me was how Ballerina is different from any other programming language and whether it can be used as a general-purpose language with OOP concepts etc. But technicalities aside, by looking at the new advancements, the most important thing I admire is that Ballerina has now found its purpose. Together with Choreo, WSO2 made it even more intuitive.
I developed this entire automation program in just under 3 hours and I enjoyed doing it. I will continue to improve the code and demonstrate more brilliant features of Ballerina and Choreo in my next articles.
Please do suggest any improvement to the code as I know there are Ballerina experts out there who could develop this code even more optimally. If your organization has an integration requirement, small or large, Talk to Us. We’re happy to help!

Sudaraka Jayashanka